
Alt image Alt image Alt image

Limited Early Access Slots

Lowest Possible Launch Price

Priority Production & Delivery

Exclusive Bonus Gifts

Fully Refundable Reservation

6.000+ Happy Maker

Co Print Quadro 3D Printer Early Access Reservation

Best Launch Conditions

Lowest Possible Price

Priority Delivery

Exclusive Bonus Gifts 

Secure your Early Access to Co Print Quadro before it launches on Kickstarter.

By reserving your spot, you gain access to the best possible launch conditions, including priority access to Early Bird rewards, the lowest effective launch price, and exclusive launch-only benefits.

Early Access members will be among the first users to receive Co Print Quadro from the initial production batch, along with exclusive bonus gifts prepared specifically for early supporters.

This is a fully refundable reservation, not a purchase.

See the Refund Policy

Track the Progress of Quadro’s Development

Quadro is currently in development, and we’re documenting the entire journey. In this transparent progress update series, we share every detail behind the scenes. From software and hardware to features, production, and prototyping, you’ll discover how our waste-free, multi-color 3D printer is being built step by step.

Leave a comment on our progress updates, share your ideas, and help shape Quadro.


Share Your Feedback


By Co Print
Company Updates
Mar 05, 2026

Our next-generation, waste-free IQEX 3D printer, Co Print Quadro, has received extraordinary interest since the very first day it opened for early reservations.
Thank you for the thousands of reservations and the trust you have shown.

Now, instead of keeping you as just observers, we want to make you a part of the process and customize the printer together with you.

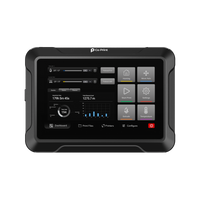
In the first post of our Progress Update series (#1), we introduce QuadrOS, the operating system that powers Quadro, and announce its beta version.

In addition, we will share an interactive form where you can tell us what you would like to see in the interface and ask the questions you’re curious about.
This way, you will be able to directly take part in the development process.


What is QuadrOS?

QuadrOS is a modern printer operating system we developed for the IQEX printer architecture. It is built on the Klipper based and designed to synchronize and manage four print heads simultaneously.

With its intuitive interface, it delivers a powerful yet easy-to-use printing experience.

QuadrOS works in full synchronization with Orca Slicer based Co Print Slicer and automatically detects the filaments installed in the printer.

For example, when you prepare a multi-color print file, you can send the model directly to the printer over the network. QuadrOS automatically matches the colors assigned in the slicer with the filaments loaded in the printer and assigns the print heads accordingly.

Without any manual setup, the correct color is assigned to the correct head, and the printing process starts smoothly.

Since QuadrOS was designed from the ground up specifically for Quadro, the filament loading and placement screens are perfectly aligned with the hardware.

The physical filament layout on the printer is mirrored schematically in the interface, allowing users to instantly see which filament is inserted into which slot and manage them intuitively.

Now, let’s explore the interface page by page.


Printing Screen

When a print starts, you are greeted by the Printing screen.
This screen is designed to give you a clear, real-time overview of the active printing process.

A colored preview of the model—exactly as painted in the slicer—is displayed on the screen. Important information such as the file name, estimated print time, total layer count, and the currently printed layer is shown directly on the interface.

There is also a dedicated print-head status widget that shows which print head is currently active and which ones are parked. This allows you to follow the printer’s movement logic and workflow in real time.

On the right side of the screen, you’ll find a global monitoring and control panel that is always accessible. Here you can see:

  • Nozzle and bed temperature indicators

  • Fan controls

  • Mini status indicators for filament slots

You can also instantly access essential printing controls such as Stop, Pause, and Speed adjustment directly from this page.

When you click on any file on the Printing Files screen, you are taken to the Confirm Print screen.

Print Starter Screen

This screen allows you to match the colors used in the file with the available print heads before the print begins. QuadrOS analyzes the colors used in the model and compares them with the filaments currently loaded in the printer.

If a different filament is installed in one of the print heads, the system will automatically notify you.

For example:
If the model contains the color blue, but there is no blue filament loaded in the printer, a clear warning will appear on the screen and you will be presented with several options:

  • Change the filament

  • Match the color with a different print head

  • Cancel the print

This ensures that potential color mismatches are detected before the print starts, keeping the entire process fully under control.

Printing Files Screen

On the Printing Files screen, the print files you upload to the printer or send via Wi-Fi are displayed in a 3×3 grid layout.

Each file is presented with the following information:

  • Model preview

  • File name

  • Estimated print time

  • Amount of filament required

This allows you to quickly browse through your files, select the model you need, and start the print with a single tap.


Filament Management Screen

The Filament Management screen is designed to help you manage the filaments installed in the printer easily and in a controlled way.

By pressing the Load button for each print head, you can automatically load filament, and with the Unload button you can safely remove the installed filament. The entire process is handled in a controlled manner by the system.

The schematic layout on the screen is designed to exactly match the printer’s physical filament arrangement. This allows you to insert the correct filament into the correct slot intuitively, without confusion.

By tapping on the loaded filament, you can select:

  • Color

  • Type (PLA, ABS, etc.)

  • Material profile

  • Brand

Based on these selections, the appropriate automatic print settings are applied for that filament.

Once the setup is complete, the color and type of the installed filament are clearly displayed in the interface, ensuring full alignment between the physical and digital setup.


Filament Configuration Screen

The Filament Configuration screen is used to configure a newly loaded filament or edit an existing one.

The screen is organized into four columns:

Brand Selection

In the first column, you select the filament brand.
Based on your choice, print profiles are optimized and manufacturer-specific settings can be automatically applied.

Material Selection

The second column is for choosing the filament type.
You can select from different materials such as PLA, ABS, or PETG, activating pre-configured print settings optimized for that material.

Color Selection

In the third column, you select the filament color.
Color-specific purge settings are automatically applied, ensuring more efficient and controlled color transitions during printing.

Settings Preview

The final column provides a preview of the applied settings based on your selections.
All configurations are summarized here, showing clearly the parameters the system will use.

Once you have completed your selections, press the Confirm button to apply the configuration.


Move Axis Page

The Move Axis page allows you to manually control all axis movements of the printer. From this screen, you can move the X, Y, and Z axes and return the axes to their Home positions with a single tap.

At the top, there is a movement distance selector that determines how far the axes move when you press the directional buttons. With step options of 1 mm, 5 mm, and 10 mm, you can achieve both precise and rapid positioning.

On the left side, you can select which print head will be controlled during X-axis movements. This allows you to position each toolhead individually and safely in a multi-print-head setup.


Settings Menu

The Settings menu is the central control area where you can access all system configurations and general information about the printer.

This section includes key settings and management options such as:

  • Wi-Fi Settings – Configure and manage the wireless network connection

  • Calibrations – Perform axis, bed, and nozzle calibrations

  • Firmware Update – Update the system software and install new versions

  • Device Information – View device details, system version, and hardware specifications

  • Language Selection – Change the interface language

By grouping all system settings under a single menu, it provides a clean and easily accessible structure.


Printer Calibration Page

The Printer Calibration page allows you to perform automatic calibration using the sensors on the printer. The entire process is designed to achieve maximum accuracy with minimal manual intervention.

Full Self Check

This option runs all calibration steps sequentially and automatically. The printer completes system checks and becomes ready for printing.

Build Plate Leveling

This calibration precisely aligns the build plate with the print heads, optimizing first-layer adhesion and surface accuracy.

Toolhead Calibration

Performs 3D (X, Y, Z) position verification for all four print heads. Ensures maximum alignment accuracy in multi-head printing architectures.

Input Shaping Calibration

Analyzes vibrations to minimize motion-induced resonance, helping achieve smoother surface quality, especially at high printing speeds.

Full Self Check System

When the Full Self Check calibration is initiated, the printer automatically executes the process step by step.

First, all axes are safely moved to their Home positions, verifying the system reference points. Next, the process moves to the Toolhead Heating stage, where all four print heads are heated sequentially to 200°C.

Once all heads reach the target temperature, the system automatically proceeds to the Nozzle Cleaning stage.

Nozzle Cleaning Stage

During the Nozzle Cleaning stage, the print heads are directed to the integrated nozzle cleaning units located at the park stations.

Each toolhead tip is automatically cleaned in sequence, removing any residual material. Once the cleaning process is complete, the print heads are safely cooled to 140°C in a controlled manner and returned to their park positions.

Toolhead Position Verification Stage

In the fourth stage, the printer performs X, Y, and Z position verification for the print heads. This process is fully automated using the 3D calibration probe located at the rear of the build plate.

Each toolhead is measured sequentially, ensuring precise three-dimensional alignment.

In the interface, calibrated print heads are marked with a green “Done” status. The head currently undergoing calibration is displayed with an animated “Calibrating…” label, while those waiting their turn appear in grey as “Waiting”. This allows the user to monitor the entire process visually and in real time.

Build Plate Calibration Stage

In the fifth stage, the Build Plate Calibration process begins. Using a single print head, the build plate is mapped in detail and the Z-offset values are calculated with high precision. Based on these measurements, the plate surface is calibrated, ensuring the optimal first-layer height.

Once the calibration is complete, the generated Z-offset values are shared with all print heads. This ensures that in a multi-toolhead setup, all heads are aligned to the same reference plane, providing a consistent and uniform print start across the system.

Vibration Calibration Stage

In the final stage, vibration calibrations are performed for all print heads and the build plate. The system analyzes potential resonances that may occur during motion and applies optimizations to minimize vibration-induced errors.

This ensures smooth and consistent print surfaces, even at high printing speeds.

Completing the Full Self Check

This completes the Full Self Check, which includes all calibration steps.
When you click the Finish button, all calibration data is saved, and the printer becomes ready for printing.

Getting to Know QuadrOS 1.0 (Beta)

We’ve had the opportunity to experience and explore QuadrOS 1.0 (Beta) in detail. Next month, the beta version will be opened to everyone.

You can share the features you’d like to see in the interface or any ideas you have page by page via this Form.
This way, you can directly contribute to the development of QuadrOS.


Where Does Quadro IQEX Stand Now?

We know you’re eager to know! We share your excitement and impatience to get the product into your hands as soon as possible.

The Quadro chassis will be produced using aluminum injection technology, and the molds are currently being prepared. Serial production of the chassis components will begin shortly.

DFM analyses for the plastic injection molds are ongoing; once these analyses are complete, mold production will commence. The entire process is progressing carefully according to our planned production schedule.

Our goal is to deliver a plug-and-play product that is user-friendly, automated, made with high-quality materials, and thoroughly tested. We continue working relentlessly toward this goal.

Although it’s too early to announce a final price, we can confidently say that Quadro will be priced below $1000.

We will continue to share every step of the production and development process transparently with our valued backers. With this, we’ve completed the first part of our progress update series.

In the next update, we’ll share further progress and provide a beta tester application form, so you can experience the printer even before it officially launches.

We’re excited to have you follow along.

With love,
The Co Print Team

Alt image

Quadro

How its work?

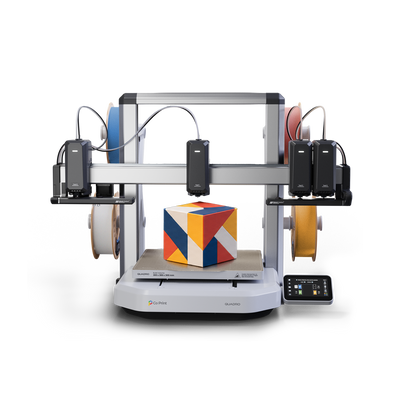
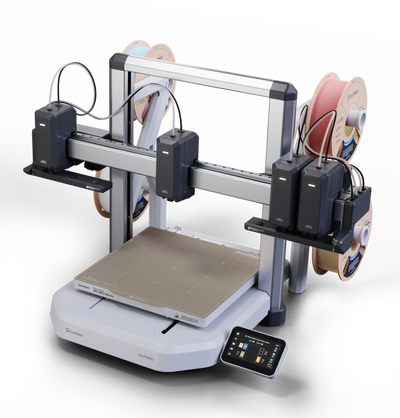
Quadro is engineered to deliver waste-free, full-color and multi-material 3D printing. Built on a bed-slinger architecture, it features four completely independent toolheads that all ride on a single X-axis but move independently from one another.


Each toolhead can be loaded with a different filament and configured with its own temperature, flow, and material parameters. This eliminates the need for traditional filament cutting, purging, or nozzle-cleaning processes—enabling true multi-color and multi-material printing with zero waste.


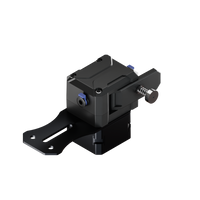
Every toolhead is powered by its own stepper motor and can operate simultaneously or independently depending on the printing sequence. On the X-axis, there are four designated parking bays—two on the right and two on the left—positioned outside the build area. When a toolhead is not in use, it parks in these stations with its nozzle capped, ready to engage instantly when its turn comes.


This architecture removes waste, reduces print time dramatically, and delivers a new generation of efficient, clean, and high-quality color 3D printing.

Quadro

How it works?

Quadro is engineered to deliver waste-free, full-color and multi-material 3D printing. Built on a bed-slinger architecture, it features four completely independent toolheads that all ride on a single X-axis but move independently from one another.


Each toolhead can be loaded with a different filament and configured with its own temperature, flow, and material parameters. This eliminates the need for traditional filament cutting, purging, or nozzle-cleaning processes—enabling true multi-color and multi-material printing with zero waste.


Every toolhead is powered by its own stepper motor and can operate simultaneously or independently depending on the printing sequence. On the X-axis, there are four designated Toolhead Parking Stations—two on the right and two on the left—positioned outside the build area. When a toolhead is not in use, it parks in these stations with its nozzle capped, ready to engage instantly when its turn comes.


This architecture removes waste, reduces print time dramatically, and delivers a new generation of efficient, clean, and high-quality color 3D printing.

Alt image

Frequently Asked Questions

How much will Co Print Quadro cost? Why should I place a reservation before launch?

The final retail price of Co Print Quadro will be announced closer to the Kickstarter launch.
 

By placing an Early Access Reservation, you secure:

  • Access to the best possible launch pricing
  • Priority access to Early Bird rewards
  • Early production and delivery advantages
  • Early Access allows you to lock in launch benefits before the product officially goes live, with no obligation to purchase.

How does the Early Access Reservation work?

Early Access Reservation is a fully refundable reservation, not a purchase.

By reserving your spot:

  • You secure Early Access status before the Kickstarter launch
  • You receive priority access to Early Bird rewards
  • You will be notified when the Kickstarter campaign goes live
  • You can choose whether or not to complete your purchase on Kickstarter

Is the reservation refundable?

Yes. Early Access Reservations are fully refundable at any time before the Kickstarter campaign begins. If you decide not to proceed, you can request a full refund—no questions asked.

How do I complete my purchase after making a reservation?

Once the Kickstarter campaign launches:

Early Access members will receive a dedicated notification

You will be guided to the appropriate Early Bird reward on Kickstarter

Your reservation benefits will be applied according to the Early Access program

Final payment and order completion will take place on Kickstarter, not on this website.

Why should I use the same email address for my reservation and Kickstarter pledge?

Using the same email address allows us to:

Verify your Early Access status

Match your reservation with your Kickstarter pledge

Ensure you receive the correct launch benefits and priority access

This helps us deliver Early Access advantages accurately and efficiently.

Is there a limit to how many units I can reserve or purchase?

Early Access Reservations are available in limited quantities.

During the Kickstarter campaign:

Purchase limits may apply to certain Early Bird reward tiers

Availability will be subject to stock and campaign structure

Details will be shared during the campaign launch.

Will Co Print Quadro be available for worldwide shipping?

We plan to offer worldwide shipping to most regions.

However: Availability may vary by country

Shipping options will be finalized and displayed during the Kickstarter campaign

What about shipping fees, taxes, and import duties?

Shipping costs, taxes, and import duties are not included in the reservation.

These details will be:

Clearly listed on Kickstarter

Calculated based on destination country and local regulations

Customers are responsible for any applicable import taxes or duties.

When will Co Print Quadro launch on Kickstarter and begin shipping?

The Kickstarter launch date will be announced soon.

Estimated shipping timelines will be shared during the campaign and may vary based on:

Production schedules

Region

Order batch

Early Access members will receive priority updates throughout the process.

What is included with the Early Access Reservation?

The Early Access Reservation itself does not include the printer.

It grants:

  • Early Bird access
  • Priority purchase opportunity
  • Launch-related benefits such as pricing advantages and bonuses
  • Full package contents will be detailed on Kickstarter.

Can the final specifications change?

Yes.

Co Print Quadro is an actively developed product.

Final specifications, features, and design details may evolve before launch to ensure the best possible user experience.

Important Notice

Early Access Reservation is not a purchase.

All benefits are subject to a successful Kickstarter launch. Final pricing, specifications, and delivery timelines may change. Reservations are fully refundable before the campaign begins.

Enter your email address to discover the details of Co Print Quadro.

Thanks for contacting us. We'll get back to you as soon as possible.

Quadro Progress Update Series

We see Quadro not just as a product, but as a project developed together with our community. Through our Progress Update series, we share key milestones from development, testing, and production. Our goal is to keep the process transparent and include community feedback along the way.

Quadro Progress Update #1

Explore the QuadrOS interface and features, learn the current status of Quadro’s development and production process, and share your feedback and suggestions with our team.