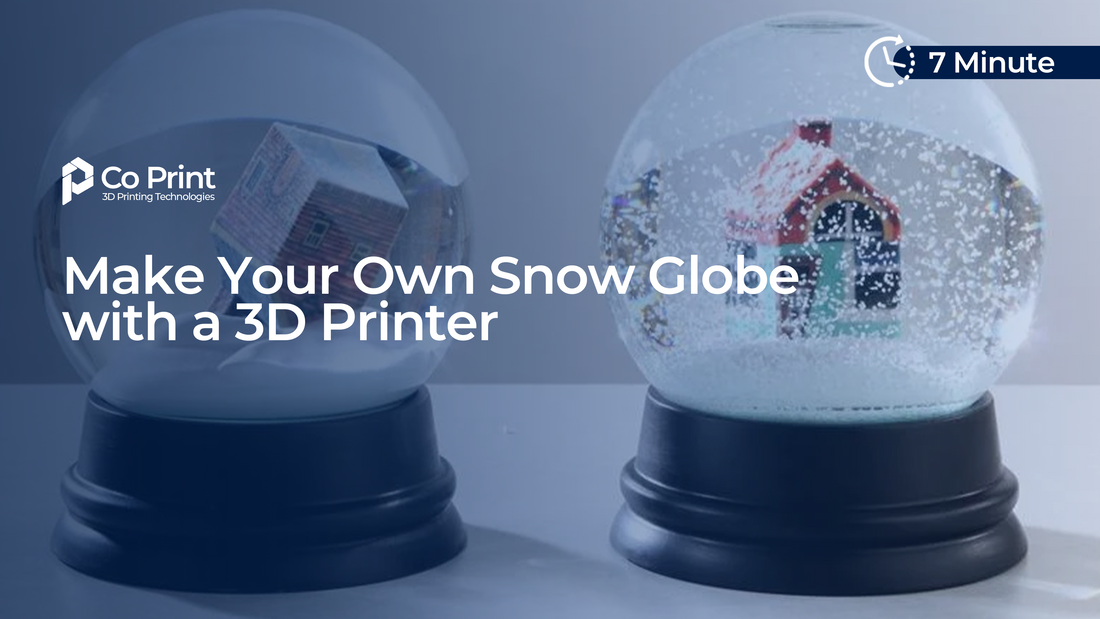
Sevdikleriniz için özel bir anıyı ölümsüzleştirmek üzere bir kar küresi tasarlayabilirsiniz. Örneğin, birlikte geçirdiğiniz unutulmaz bir tatilin anısını yansıtan minyatür bir şehir veya yıldönümünüzü kutlamak için isimlerinizin kazındığı bir figür yaratabilirsiniz... 3D yazıcı kullanarak hayalinizdeki sahneyi hayata geçirebilir ve sevdikleriniz için eşsiz bir hediyeye dönüştürebilirsiniz.
Bu yazıda, 3D yazıcıyla kar küresi yapım sürecini ayrıntılı olarak ele alacağız. İhtiyacınız olan malzemeleri, baskı sürecinde nelere dikkat etmeniz gerektiğini ve en uygun sıvı karışımı nasıl hazırlayacağınızı adım adım açıklayacağız. Ayrıca, projenize rehberlik edecek tasarım ilhamları da vereceğiz.
Co Print ile tek bir baskıda çok renkli figürler ve detaylı tasarımlar oluşturabilirsiniz. Böylece kar kürenizin içindeki minyatür sahneleri daha canlı ve gerçekçi hale getirebilir, renk geçişleriyle özel dokunuşlar katabilirsiniz. Şimdi, hayalinizdeki kar küresini gerçeğe dönüştürmek için gerekli adımlara geçelim!
Aşağıda, 3D yazıcıyla kar küresi yapmak için gereken malzemeleri ve bunları nereden temin edebileceğinizi listeledik. Seçtiğiniz malzemeler, projenizin kalitesini ve dayanıklılığını doğrudan etkileyecektir.

Malzemeler
Kar Küresi Kabı (Cam veya Akrilik Küre)
Kar küresinin sızdırmaz olmasını sağlamak için kaliteli bir kap seçmek önemlidir. Cam küreler daha şık bir görünüm sunarken, akrilik küreler daha dayanıklıdır ve kırılmaya karşı dirençlidir.
Su ve Gliserin
Kar küresinin içindeki suya gliserin eklenerek yoğunluğu artırılıyor ve kar tanelerinin daha yavaş düşmesi sağlanıyor.
Parıltılar, Simler ve Yapay Kar Taneleri
Kürenin içine kar efekti vermek için sim veya küçük yapay kar taneleri kullanabilirsiniz.
Su Geçirmez Yapıştırıcı
Kürenin içindeki figürlerin güvenli bir şekilde yerinde kalması ve su geçirmez bir sızdırmazlık sağlanması için epoksi veya silikon bazlı yapıştırıcılar gereklidir. E6000 Şeffaf Su Geçirmez Yapıştırıcı veya Loctite Epoksi Yapıştırıcı kullanabilirsiniz.
Dekoratif Objeler
Kar küresinin içini süslemek için minyatürler yazdırabilirsiniz. Hazır tasarımları tercih ediyorsanız, Thingiverse veya Printables gibi platformlardan ücretsiz modeller indirebilirsiniz.
Örnek 3D Model Bağlantıları:
Kar Küreleri İçin Uygun ve Uygun Olmayan Filamentler
Uygun Filamentler:
-
PETG
-
PLA+
-
ABS
Kaçınılması Gereken Filamentler:
-
PVA, BVOH (Suda Çözünür Filamentler)
-
Ahşap Esaslı Filamentler (Ahşap PLA, Bambu PLA)
-
Standart PLA
-
TPU veya Esnek Filamentler
-
Naylon, Polikarbonat (Nem Emici Filamentler)
Kar Küresi Yapımı
Adım 1: Tasarımı 3D Yazıcıyla Yazdırın
Tasarımınızı matbaaya gönderin ve baskı sürecini tamamlayın.
Adım 2: Sıvı Karışımı Hazırlayın
Kar tanelerinin kürenin içine düşme hızını ayarlamak için %70 su - %30 gliserin karışımı hazırlayın. Daha yoğun bir kar efekti istiyorsanız, gliserin oranını artırabilirsiniz.
Kar efekti için sim veya yapay kar taneleri kullanabilirsiniz. Bunları sıvıya ekleyin.
Önerilen Gliserin Oranı:
-
%70 Su - %30 Gliserin → Orta düşme hızı
-
%60 Su - %40 Gliserin → Daha yavaş düşme hızı
-
%50 Su - %50 Gliserin → En yavaş düşme hızı, yoğun etki
Adım 3: Figürleri ve Diğer Süslemeleri Yerleştirin
3 boyutlu yazdırdığınız figürleri kar küresinin içine yerleştirin. İstediğiniz sahneyi oluşturduktan sonra, figürlerin güvenli bir şekilde yerinde kalmasını sağlamak için epoksi veya silikon yapıştırıcı kullanın.
4. Adım: Küreyi Mühürleyin
Kürenin alt kısmına yapıştırıcı (epoksi veya silikon) sürün ve sıkıca kapatın.
Küreyi kapattıktan sonra dikkatlice kurumasını bekleyin. Yapıştırıcı kuruduktan sonra, kürenin içindeki sıvı güvenli bir şekilde yerinde kalacaktır.
Adım 5: Son Rötuşlar
Gece daha büyüleyici bir etki yaratmak için kar küresinin tabanına küçük LED ışıklar ekleyin.

Kendi özel figürlerinizi ve sahnelerinizi bastırarak sevdiklerinize unutulmaz bir anı hediye edebilirsiniz. Hem tasarım hem de baskı aşamalarında kullanabileceğiniz çeşitli malzemelerle, her temaya uygun bir kar küresi yaratmanız mümkün.
Bu rehberdeki adımları izleyerek hayalinizdeki kar küresini gerçeğe dönüştürebilirsiniz. Yaratıcılığınızı gösterin ve benzersiz ve özel bir hediye hazırlayın.